Decorative Pumpkins

Well with it officially being October, it is definitely time for some pumpkin decorating!

Image

A couple of friends of mine from work held a pumpkin decorating party..

Image

And it was really fun! Normally I only carve pumpkins, but this is way cuter and a lot less messy!

Image

Image

Image

Image

Four very different pumpkins! I had no idea on how I was going to decorate them so that’s why lines aren’t straight, things aren’t even, and a lot of glitter is outside the lines. But sometimes that’s okay. It was about hanging out with some new friends and displaying cute pumpkins at my house. Hope this inspires you to decorate your own!
Here are the pumpkins my friends made:

Image

ZORO!!!!

Image

Image

Godzilla!! (crazy detailed, right!?)

Image

Made for her husband who is coming home from Afghanistan soon!

Image

Image

Happy Pumpkin decorating! I know I will be making more, and I would love to see yours!

Stay lovely,
Jenna

Fall Wreath

YEAH PEOPLE IT’S FALL

Image

So that means it is time for fall stuff. I already decorated a couple weeks ago, I just couldn’t wait.

So today we are making a lovely fall wreath to hang on your front door.

Supplies:
Image
1 hay wreath (hay is very Fall feeling, and it is $3 so yay)
1 30 yard ribbon in Orange
1 ‘rope piece’ of leaves
1 burlap sunflower
1 burlap pumpkin
3 twigs with balls on the end
1 glue gun and TONS of glue sticks

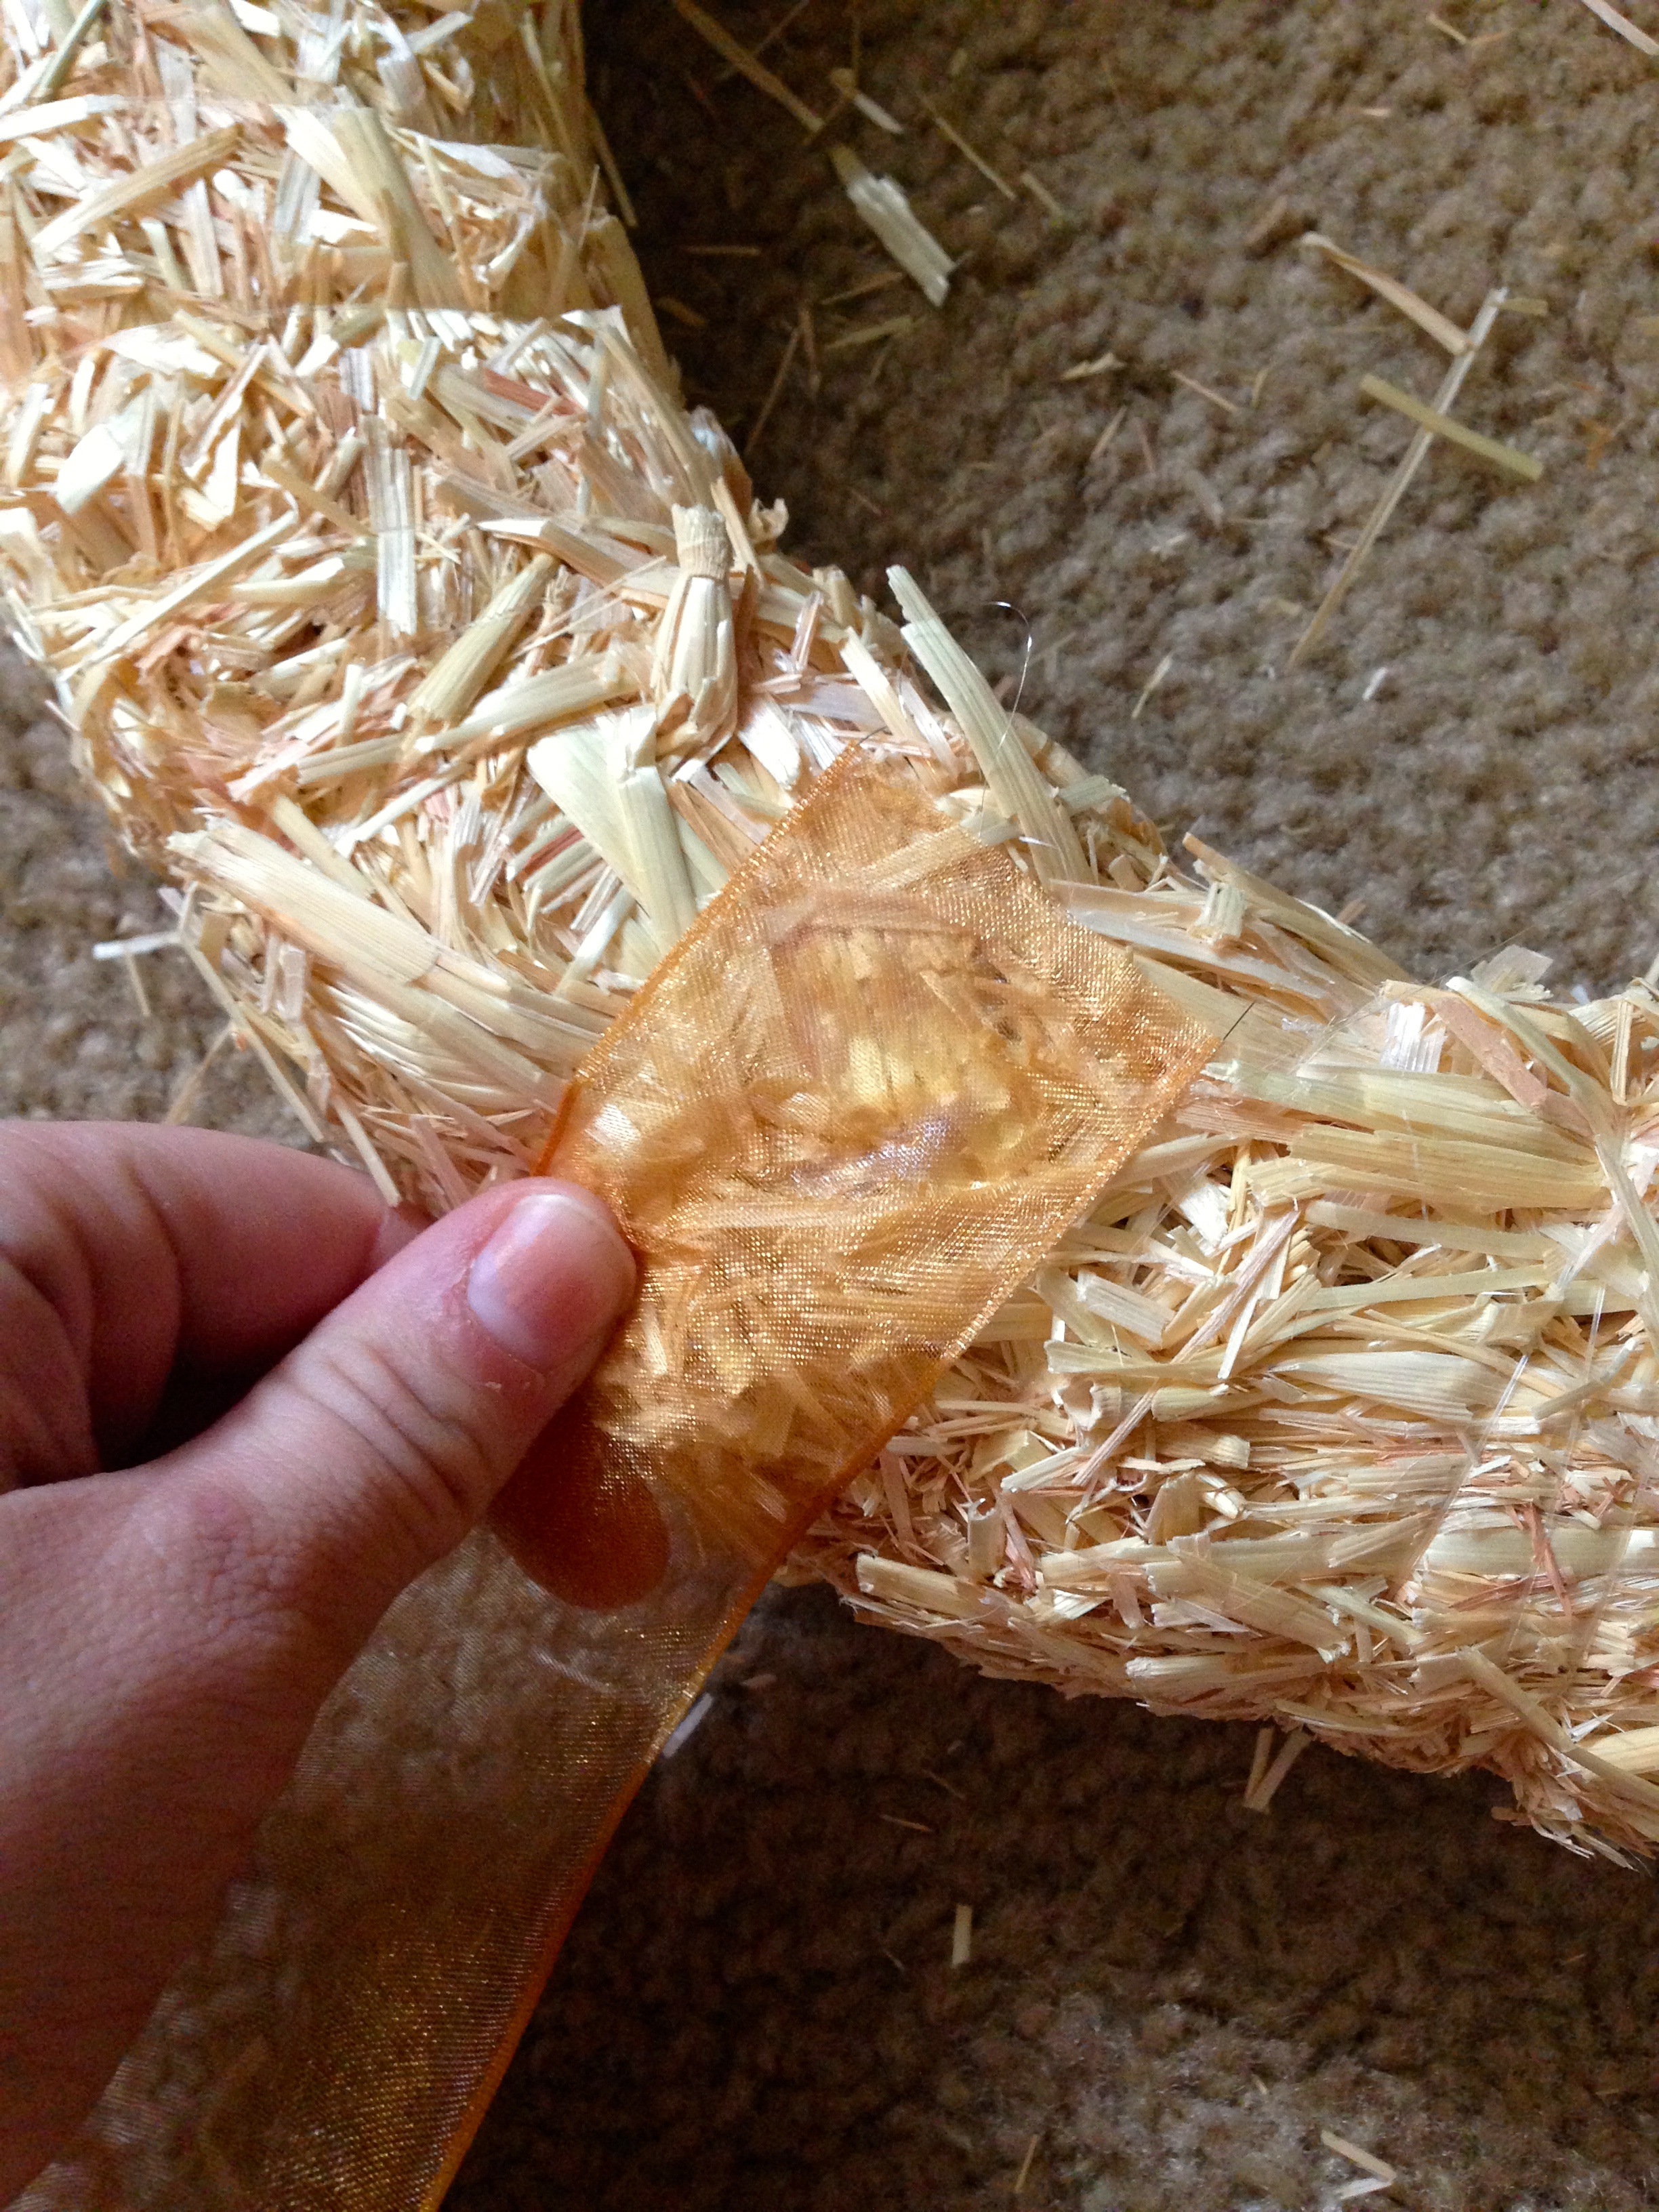
First, wrap your wreath with the ribbon.
Start on the back by putting a good sized spot of glue and attach ribbon.
Image

Continue to wrap ribbon around the wreath. Every other wrap, I put more hot glue on the back.

Image

And here is what your wreath will look like after the ribbon (and yes, I almost used all 30 yards).
I love this look for many reasons. You can still see the hay through the ribbon, and yet there are pieces that are dark and leave spots of dark orange visible after you put the rest of the pieces on. Of course if you do not want any hay showing, just wrap the wreath again with the ribbon and this should solve the problem quite nicely.

Next, I took the leaves and wrapped them in the same manor as the ribbon. I am sorry, I do not have any other pictures of step by step. They seemed to have run off of my camera. Once you wrap the leaves around, flip over the wreath and cut off the ones that are facing backwards. This not only cleans up your wreath a little, it also gives you extra leaves that you don’t to buy to decorate with :). Next, eyeball where you would like your pumpkin, sunflower, and sticks. And glue.

Image

Image

When my friend saw  my wreath she said, “Oh so you decided to go out and buy a wreath instead of making it?” Uh.. yeah sure I did ;).

Wreath TIP: Do NOT be afraid to use a LOT of hot glue. More glue means it will stick better, and ultimately last longer.

We also went and bought out first mini pumpkins of the season and I picked up a cute owl Halloween decoration

IMG_2505IMG_2552

DIY Stamp and DIY Wrapping Paper!

Hello lovelies! Today you are getting not one, but TWO DIYs in one post. What a lucky day for you!
Today, I will be showing you how to make your own stamp, and how to make your own wrapping paper.

How To Make Your Own Stamp;

Image

Supplies Needed:

  • wood pieces (found at Hobby Lobby, two for $1.79)
  • Puffy shirt paint
  • pencil

Step 1: draw your own design onto the wood piece. For best results, try not to make a design that has small, detailed pieces. When you add the puffy paint, it will be thicker and can make your design a big blop.
Step 2: Trace over your pencil lines with the paint. Let it dry thoroughly. If you do not let it dry completely, when you go to stamp you could smooth in your wet paint and have a messy stamp on your hands.
Step 3: Stamp your new stamp in some ink or paint and stamp away!

ImageImage

Now for the wrapping paper….

You will need your new hand-made stamp, and some parcel paper. I bought a roll of brown paper on Amazon for about $7. You can get multiple colors like black, white and brown. Or for small gifts, you can use just a normal 8 by 11 piece and stamp that!

Step 1: Wrap your present with just the plain paper to measure out how much wrapping you will be using.
Step 2: Roll out, and stamp away! Let paint/ink dry and you can wrap your present.

Image

Image

After I wrapped the presents, I added some baker twine and a hand made card!
I chose to make the daisy stamp for a friend’s wrapping paper, because that was her wedding flower. It was very cute, and fit right in because she had a country wedding, complete with bails of hay and burlap sacks.

I hope you make some lovely stamps and cute wrapping paper!

Herb Planters

ImageOne of the things I love most about Kansas is the fact that I get to have my own garden!

See, in Arizona most of everything just dies. I mean the only place we have grass is at the park (and I’m sure they pay a fortune to water it with the 120 degree weather). So I’ve really loved having a garden. I love flowers and things like that. However, my older brother (who lives in California and has his own garden) started to rub off on me. His garden consists of all things you can eat, while mine is full of pretty flowers and bushes.

So I decided to plant some herbs! And I hope to rub off on you too, so you plant some as well! I planted basil, thyme, parsley, and cilantro. Now you might be thinking ,”I don’t even use those herbs”. But would you use them more if you had them lying around and they were free? Probably.

Image

To make the planters, I just painted the top and bottom different colors. I used a paint pen to write the different names of the herbs on the outside. And they’re super cute!

They definitely spice up the kitchen with the bright colors. I’m in love, and I can’t wait to season my food with my own herbs!

Pretty Planters

IMG_2127IMG_2127IMG_2127

SO I saw this picture online of some cute ribbon glued to a pot. And thought, “well why didn’t I think of that sooner” and “how CUUYTEE”.

I am a die heart scrapbooker, so ribbon is something I totally love. Plus, I am an old lady so I love ribbon and lace attached to anything.

Super hard steps to make:

1. Get pot and ribbon and glue (or Mod Podge) and scissors.
2. With a paint brush, paint the areas in which you want the ribbon to be. I’ve seen people use regular Elmer’s glue, and it works just fine. I used Mod Podge’s Matte, which is a glue, sealer, and finish.
3. Apply ribbon to glue.
4. (Optional, but recommended) After sticking the ribbon to glue, apply another layer of glue over the ribbon. This helps it to stick better and prevents it from coming up at the edges.

And now you have yourself some cute pots!

IMG_2124

IMG_2125 IMG_2126

Postcards

ImageImageImageImage


I love sending mail and receiving mail. I think it is actually a lost art, sending mail that is. It is now solely reserved for the ever lovely bill mail, which everyone hates. However, my cousin is into post card sending and is involved with a group that sends them around the world. She has sent over 3.2 million miles of post carding, which is equal to 129 trips around the Equator! So it rubbed off on me, and I have started sending postcards. (Really only to her and my friends back home, but hey, it’s a start).

And anyone who knows me knows I’m totally obsessed with the Wizard of Oz, so of course I had to send Wizard of Oz postcards. And I thought I’d share them with you.

Image

Mr. and Mrs. Signs

My first DIY!

Image

I started making these signs for Wilson’s second year Army Birthday, which was July 11th. And I just now finished them. Hey, a present is better late than never! These were super easy.

Buy Wood. Paint wood. Draw stencil. Cut out stencil. Trace on wood. Paint in stencil lines. Make a back for mounting. Put on wall. Ta-da!

ImageImageImageImagebedroom2

My cat, Mr. Timone, loves the signs too!

Image